Check the diameter of the pipe and make sure you are
using a correctly sized product.
2.
Make sure that the sealing gasket is fitted evenly
around the outlet.
3.
Clean the pipe to remove as much dirt and corrosion as
possible from the surface. Scrape the pipe to remove dirt
and corrosion so that the surface is smooth. Use soapy
water if necessary.
Do not use grease on the gasket
material.
4.
Remove nuts, washers and lifter bars from the bolts, being
careful not to loose the nuts and washers.
5.
Keep threads free of foreign material to facilitate tightening
6.
Avoid loose fitting wrenches, or wrenches too short to
achieve proper torque on nuts.
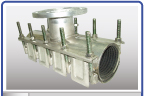
Installation
Step 1
Place the clamp band with the flange outlet on the pipe and move it into
position.
Step 2
Bring the second clamp band into position making
sure that the bolts are located between the
lugs on the clamp band with the flange outlet. Check the gasket edges along the
clamp bands to be sure they overlap and are
not folded over.
Step 3
Replace the lifter bar, washer and nuts and tighten the nuts by
hand.
Tighten the nuts evenly using a torque
wrench with a handle of at least 300 mm in length starting with
the centre bolts, alternating on either side of the clamp.
Recommended torque : 7 kg / m.
The gap between the clamp bands on either side should be the
same when nuts are not fully torqued.
Torque down all nuts evenly.
Always pressure test for leaks before making a hot tap on pipe.
If leakage occurs repeat step 2 and 3. Then pressure test again.
Step 4
Wait 20 minutes and then retighten to proper torque.
Note:
When installed on plastic pipes, do not use soapy water
on the gasket and reduce the recommended torque by 50 % in
order to avoid extrusion of the gasket.