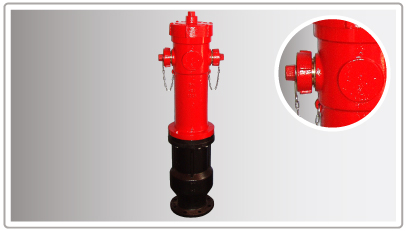
DN150 FIRE HYDRANT WITH TWO OUTLETS AND LENGTH 165 cm
FIRE HYDRANTS TECHNICAL DESCRIPTION
Use
For the supply of water in case of fire-fighting.
Operating pressure
16 bar.
Sealing test pressure
17,6 bar.
Body test pressure
24 bar.
Available sizes
a) With total height 165 cm and weight 160 Kg
b) With total height 210 cm and weight 190 Kg.
Hydrant has two outlets of diameter 2 ½'' (64 mm) left and right symmetrically.
Hydrant body and duck foot bend of 90 degrees are made of grey cast iron GG25.
Above ground shaft and below ground shaft are made of stainless steel.
Joint pins which withhold all inner parts of hydrant are made of stainless steel.
Disk seat is made of copper alloy.
Sealing with EPDM suitable for potable water.
Bolts are made of stainless steel.
The hudrant opens with direction opposite to clockwise with the help of proper direction indicating arrows marked on the cap.
There is an anti breaking system in the above ground hydrant part in case of an accident with vehicles so as there is no water loss.
At the low part of the hydrant body above ground there is a drainage hole cover so that water is released when hydrant is turned off.
All cast parts are sandblasted after casting and they are painted with proper paint.
The above ground hydrant part has red colour and the below ground hydrant part has black colour.
GOOD GUARANTEE OF USE FOR TWO YEARS.
WHOLLY MANUFACTURED IN GREECE.
FIRE HYDRANTS INSTRUCTIONS FOR USE
1. INSTALLATION
Each hydrant is carefully tested before being sold. Therefore the correct
installation is the only requirement enabling the hydrant to work properly.
Connect the duck foot bend to the water network using proper bolts and gasket.
Check that the foot bend is properly fixed: the flange which has to be connected to
the hydrant must be perfectly horizontal.
Connect the hydrant to the foot bend using bolts and gasket supplied from
manufacturer.
During connection of hydrant to the foot bend check the hydrant is closed. Check
that no impurities stands around the obturator. Most of problems during final test
occur because during this phase some impurities enter the hydrant and land on
the disk of obturator causing leakage between disk and seal.
Bury the underground part of hydrant taking care to leave bolts of flanges off of
ground level and accessible for operating. This is important to avoid any digging
work when hydrant disassembling is needed. Than put gravel all around the
automatic drainage hole in order to allow water to escape very quickly. Take care
that size of stones is bigger that the size of the drainage hole
2. USE
Hydrant is a fire-fighting device. Use it only in case of fire. Any other use is
not allowed.
In case of fire, approach the hydrant with the suitable water device (fire hoses,
etc.).
Open the blank cap with the suitable spanner and connect the device. Note the
device to be connected has to bear same thread of the hydrant connection which is .5 (+0.5 /-0), 5 threads per inch , angle 55o.
Open the hydrant turning the cap anti-clockwise.
The operating cap shall be fully open enabling the hydrant working properly. If
the hydrant is not fully open pressure drop prevent to get the maximum flow rate
available and the water come out of the hydrant from the hole of the drainage
system.
After use, take out the fire-fighting devices from connection. Close the hydrant
turning the operating cap clockwise. Close the hydrant completely in order to
allow the drainage system to work properly. Leave caps open to
allow air coming in. After 15 minutes water is completely drained off. Put the
caps on connection and turn them with the spanner to get tightness.
3. MAINTENANCE
The hydrant is designed in such a way that once it is
correctly installed it does not require special care.
We recommended to open the hydrant at least once a year in order to check no
damages have occurred.
If leak of water is noticed once the hydrant is close, it is
normally due to seal of the disk.
To replace the seal of disk or in case any other inconvenient requires hydrant
disassembling, proceed in the following way:
Close the isolating valve to stop water.
Turn the operating wheel
anticlockwise to open the hydrant. This is important to avoid danger of water
pressure.
Take out the pin of the cap.
Remove the cap.
Unscrew the blank cap fixing screw and remove the blank cap.
Then take off the above shaft.
Remove the breaking device and take off below shaft.
Change the seal of obturator.
Replace all parts.
Before assembling the hydrant grease the rotating parts and the seat of the
drainage system.